I began testing a few weeks ago by creating a few test VM's on the NFS mounted volume and after that went well I moved on to migrating a few existing non-critical VM's to the NFS mount. The performance over NFS was quite good and after letting things run for about a week I did not see anything obviously wonky with the virtual machines so I decided to enable deduplication or "Storage Efficiency" as NetApp calls it. One thing to note is that the deduplication only works for data added after it has been enabled. So if you have an existing volume that is already filled with data you won't see much benefit unless you tell the NetApp to scan all the data on volume.
HOW TO
So let's start with the command to manage dedup on a NetApp. The command is named 'sis'. Running sis with no options will give you the list of available optionsnetapp2240-1> sis
The following commands are available; for more information
type "sis help
The sis status command will show you if dedup is enabled.
netapp2240-1> sis status
Path                           State      Status     Progress
/vol/testvol                   Disabled   Idle       Idle for 02:12:30
/vol/vol_prod_data             Enabled    Active     70 GB Scanned
The sis on /vol/volname command will enable dedup on a volume.
netapp2240-1> sis on /vol/testvol
SIS for "/vol/testvol" is enabled.
Already existing data could be processed by running "sis start -s /vol/testvol".
Notice that helpful message about processing already existing data? The default schedule once dedup is enabled is to run the process one a day at midnight. You can kick off the process manually with the sis start /vol/volname command. The start command has a '-s' option which will cause the dedup scan to process all of the existing data looking for duplication.
netapp2240-1> sis start -s /vol/testvol
The file system will be scanned to process existing data in /vol/testvol.
This operation may initialize related existing metafiles.
Are you sure you want to proceed (y/n)? y
The SIS operation for "/vol/testvol" is started.
netapp2240-1> Wed Jul 11 14:10:06 CDT [aus-netapp2240-1:wafl.scan.start:info]: Starting SIS volume scan on volume testvol.
You can use the sis status command to monitor the progress of the deduplication process.
netapp2240-1> sis status
Path                           State      Status     Progress
/vol/testvol                   Enabled    Active     4 KB (100%) Done
RESULTS
For my volume that is storing VMware virtual machine disks I am seeing an unbelievable 59% savings of disk space. It's pretty crazy. I keep adding virtual machine disks to the volume and the used space hardly grows at all. So far all of the virtual machines I have put on this volume are Linux. I expect once I start adding some Windows VM's the savings will go down somewhat.
To highlight the importance of using the '-s' option to process all existing data I have this example from a volume that is used as a file share for user data. We enabled dedup and after several nightly dedup runs we were disappointed to see almost no savings.
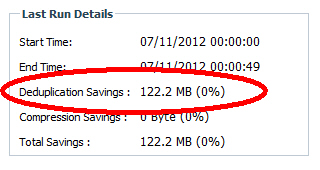 |
| Dedup enabled but without initially using the '-s' option. |
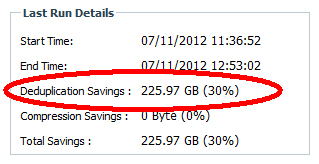 |
| After reprocessing with '-s'. |
I recommend enabling deduplication on any file share volumes or VMware volumes. You will probably see more savings with the VMware volumes because multiple copies of operating systems will have lots of duplicate files. So far I have seen between 15-30% savings for file share volumes and up to 59% savings for VMware volumes.
No comments:
Post a Comment
Please note all comments are moderated by me before they appear on the site. It may take a day or so for me to get to them. Thanks for your feedback.